
How to Replace a Broken Kia Side Mirror:
How to Replace a Broken Kia Side Mirror: A Complete DIY Guide (Because Side-Eyeing Traffic Just Isn’t Enough)
So, your dependable Kia’s side mirror got smashed and now looks like a sad little relic of its former self? First off, condolences. But before you start squinting and guessing traffic from memory, let me stop you: driving without a working side mirror isn’t just uncool—it’s unsafe and illegal in many places.
Good news? You don’t need to rush to the mechanic’s shop begging for help. With some patience, basic tools, and this step-by-step Kia side mirror replacement guide, you can fix it yourself and get back on the road looking sharp in no time. Let’s jump into the DIY action without any headache-inducing jargon or wrench-tossing frustrations.
Why Replacing a Broken Kia Side Mirror Really Matters (Beyond Just Insurance Claims)
Imagine this: you signal to change lanes, glance at your side mirror, and all you see is a cracked, broken mess. Not exactly confidence-inspiring, right? Side mirrors aren’t just style ornaments or quick lipstick-check stations—they’re essential for expanding your field of vision and banishing blind spots.
Heads up:
- Most states and countries legally require fully functioning side mirrors.
- Driving with a broken mirror can lead to fines—no amount of charm will fix that ticket.
- Plus, a complete, sleek mirror keeps your Kia looking well-maintained, boosting resale value and street credibility.
According to the NHTSA, thousands of accidents happen yearly due to blind spots. So, skipping a mirror replacement? That’s like playing automotive roulette with your safety.
Identify Your Kia Side Mirror: Know Your Enemy Before You Fix It
Before you become a mirror master, pinpoint which type of side mirror you’re dealing with. Kia offers several variations:
- Manual vs. Power Mirrors: Older Kias rely on manual twist knobs. Newer models typically feature power mirrors with adjustments, folding, and sometimes defrosting—because frozen fingers are nobody’s friend.
- Color-Matched or Black: Some mirrors blend seamlessly with your Kia’s paint, others rock bold black finishes.
- Extra Features: Turn signals, heating elements, blind spot sensors—if your mirror had a résumé, these would be its special skills.
Get the exact mirror type down—otherwise, you risk buying a part that looks like it belongs on someone else’s ride. Awkward.
Tools & Materials You’ll Need: The Ultimate DIY Toolkit
Gather these essentials before picking up that wrench:
- Phillips and flathead screwdrivers (the dynamic duo)
- Socket wrench set (because bolts won’t come off themselves)
- Plastic trim removal tools (gentle on your car’s interior)
- Replacement side mirror (OEM for perfect fit or aftermarket for budget-friendly options)
- Electrical tape (for power mirror connections)
- Weatherproof adhesive or sealant
- Gloves and safety goggles (safety first!)
Pro-tip: Keep some snacks handy. Trust me, you’ll thank me later.
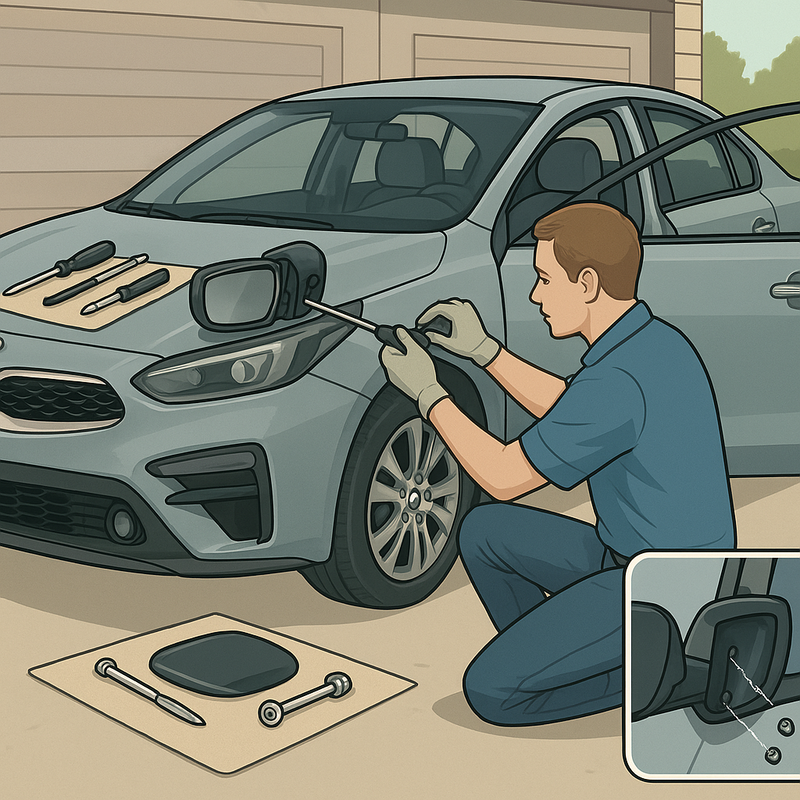
Step-by-Step: Replace Your Kia Side Mirror Like a Pro
Step 1: Order the Correct Side Mirror
Know your Kia’s model year and trim to order the exact replacement mirror. OEM parts guarantee fit but can be pricier; aftermarket options save cash but might not match perfectly.
Step 2: Prepare Your Workspace
- Park your Kia on flat, level ground.
- Turn off the engine and disconnect the battery if replacing a power mirror (safety first).
- Roll down the window for easier access.
Step 3: Remove the Interior Door Panel or Trim
- Locate hidden screws or fasteners near the mirror.
- Carefully pry off the panel using your plastic trim tools—no brute force!
- Watch out for clips and wiring tucked like ninjas.
Step 4: Disconnect Electrical Connections (For Power Mirrors)
- Unplug the electrical connector.
- Wrap any loose wires with tape to prevent rattling.
Step 5: Unscrew & Remove the Broken Side Mirror
- Use a socket wrench or screwdriver to loosen the bolts.
- Hold the mirror firmly to prevent it from falling.
- Remove the old mirror assembly carefully.
Step 6: Install the New Side Mirror
- Mount the new mirror onto the bracket.
- Tighten bolts securely for stability.
- Reconnect wiring if it’s a powered mirror—otherwise, it’s a fancy but useless ornament.
Step 7: Test Everything
- Reconnect the battery.
- Test mirror functions—adjustability, folding, heating, signals. Treat it like a new pet; it needs to respond well.
- Ensure the mirror is firmly attached (you don’t want it flying off mid-drive).
Step 8: Reassemble the Door Panel
- Snap or screw the panel back in place.
- Check for loose parts—no rattles allowed.
- Clean the mirror surface to remove fingerprints.
Tips for Kia’s Most Popular Models
Kia Optima & Forte
Power mirrors with heaters and blinkers. Wiring must match perfectly to avoid disco-light signal fails.
Kia Soul
Manual or power mirrors. Manual models are straightforward, but be careful with paint-matching for repairs.
Kia Sorento
Large mirrors often with built-in turn signals. Double-check wiring to keep indicators flashing smoothly.
Common Challenges & How to Fix Them Like a Grown-Up
- Stubborn Screws: Try penetrating oil and quality screwdrivers.
- Damaged Wiring: Don’t mess with frayed wires; replace harnesses or get professional help.
- Paint Mismatches: Consider professional painting if you want a flawless finish.
Should You DIY or Call a Pro? Here’s the Truth
If you’re comfortable with tools and not easily rattled by minor hiccups, DIY is a wallet-friendly option that takes roughly 30-60 minutes.
However, if your mirror has advanced sensors, cameras, or a spaghetti mess of wiring, calling a pro ensures safety and saves stress.
How to Avoid Future Side Mirror Drama
- Use parking sensors or camera aids for tight spots.
- Add mirror covers or guards.
- Always fold mirrors in tight parking situations—unless you like risky reruns of “mirror vs. mailbox.”
Final Thoughts: Give Your Kia Back Its Side-Eye Power
Replacing your Kia’s broken side mirror is more than cosmetic upkeep—it’s a crucial safety and legal step to keep you and others protected. With this guide, you have all the tools and knowledge to tackle the job yourself or decide when to get expert help.
So grab your tools, boss that damaged mirror, and drive confidently knowing you’ve got your side vision back where it belongs.
Next time your kid asks if you’re done talking about car repairs, you can smile and say, “We fixed the mirror, champ. Progress!”
Ready. Set. Order. DIY. Drive. Repeat.
For more DIY car repairs and tips, visit Kia’s official website or trusted auto repair blogs. Your car—and your wallet—will thank you.
Drive safe, mirror master. 🚗✨
Posts Widget
-
1

-
2

-
3

-
4

G-SPARTS – Leading Auto Parts Supplier Since 2009
Trusted by 1000+ Clients Worldwide | Chinese (BYD, Geely, Chery, …), Japanese (Toyota, Honda, Nissan, …), European (BMW, Mercedes, VW, …) & American (Ford, Chevrolet, Tesla, …) Car Spares | Best Prices & OEM Quality | 15+ Years Expertise | Professional Team, Fast Global Shipping
Copyright 2025 © G-Sparts All Rights Reserved. | Premium Chinese Auto Parts Supplier – Worldwide Shipping | Best Prices on OEM & Aftermarket Spares
