
Genuine Honda Oxygen O2 Sensor 36531-R1A-A01/36531-R1A-Axx – Expert Fitment Guide, Testing & Pro Install Tips | G-Sparts
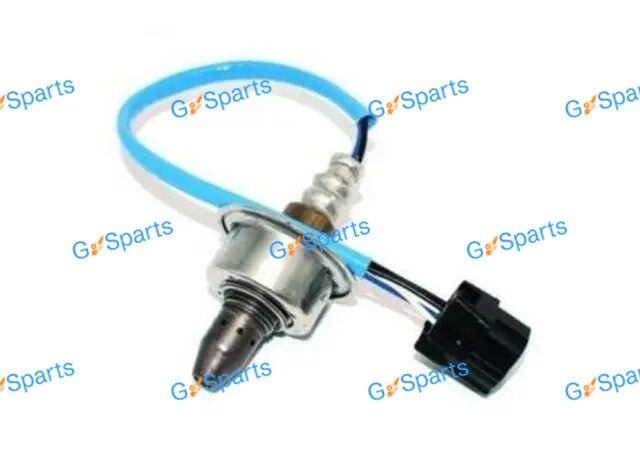
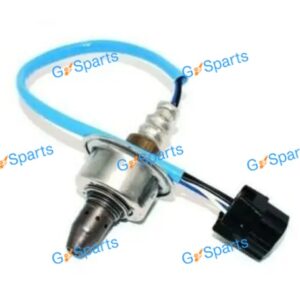
O₂ sensor for Accord (2014+), Civic (2012–2015), HR‑V (2016–2022) – Upstream / pre‑cat. Specs: 4‑wire heated A/F for precise control; OE connector, direct‑fit.
Did you like this product? Add to favorites now and follow the product.

(+86) 180 07 12 47 38 WhatsApp, Telegram, WeChat
Description
OE‑style oxygen (lambda) sensor listing for Honda applications. Models: Accord (2014+), Civic (2012–2015), HR‑V (2016–2022). OEM/reference(s): 36531-R1A-A01 / 36531-R1A-Axx. Position: Upstream / pre‑cat. Typical specification: 4‑wire heated A/F for precise control; OE connector, direct‑fit. Brands/cross‑refs: Denso / Bosch aftermarket cross‑refs. Fitment guidance: Use VIN to pick the correct R1A suffix for your engine/market. Source: hondapartsnow.com.
How Upstream Oxygen Sensing Shapes Everyday Drivability
A well-tuned engine relies on rapid, accurate exhaust feedback to maintain the ideal air–fuel ratio under changing loads. The upstream sensor—positioned before the catalytic converter—reports oxygen content so the ECU can trim fueling in milliseconds, smoothing idle quality and sharpening throttle response. As the sensing element ages, its switching slows and amplitude narrows, forcing trims to swing wider and delaying closed-loop operation after cold starts. Drivers notice subtle surging at steady speeds, fuel smells during warmup, and inspection monitors that lag. Replacing a tired unit restores crisp oscillation and shortens warmup time, protecting the catalyst and your fuel budget. For Honda owners targeting dependable, factory-spec feedback, the proven choice is Honda Oxygen O2 Sensor 36531-R1A-A01/36531-R1A-Axx.
What the Part Designation Encodes and Why Precision Matters
Factory identifiers encode more than a name; they capture connector indexing, lead length, heater wattage, thread pitch, and the zirconia cell’s switching character. A near-match might bolt on yet deliver the wrong warmup curve or voltage targets, leading to nuisance faults or long adaptation periods. Precision here safeguards catalytic converter health, emissions compliance, and drivability during weather swings. Always confirm plug keyways, pin count, and loom clip locations against your car before ordering. When your invoice, label, and listing align, you’re matching both geometry and calibration—the foundation of a first-time-right repair. For the applications covered in this guide, that alignment is achieved by selecting Honda Oxygen O2 Sensor 36531-R1A-A01/36531-R1A-Axx.
Fitment Verification: Visual Checks That Prevent Surprises
Start by locating the upstream bung and noting whether access is from above or below. Photograph the harness path, paying attention to stand-offs and heat shields that create safe spacing. Count connector pins, examine indexing rails, and measure the existing lead to ensure the replacement reaches every clip without tension. Compare under-hood emissions labels with catalog notes; regional packages may alter plug keys, shield shapes, or routing. These observations prevent improvisation that can chafe insulation or strain crimps. When physical cues align with documentation, installation becomes routine rather than risky. In this context, the unit that preserves proper routing, indexing, and calibration is the Honda Oxygen O2 Sensor 36531-R1A-A01/36531-R1A-Axx.
Early Symptoms Pointing to a Sluggish Upstream Signal
Aging oxygen sensors typically degrade gradually, so problems creep in. Expect a minor drop in fuel economy, faint surging at steady cruise, or a check-engine light that appears after longer highway runs. Cold mornings may bring a soft stumble as the heater struggles to reach operating temperature quickly. On a scan tool, switching slows and amplitude narrows, while short-term trims swing harder to compensate. Left alone, this drift burdens the catalytic converter and risks efficiency codes. If these patterns match your experience, renewing the upstream unit can reset the feedback loop. The direct-fit component many Honda owners choose for this exact scenario is the Honda Oxygen O2 Sensor 36531-R1A-A01/36531-R1A-Axx.
Data-Led Diagnosis Using Scan Graphs and Basic Meter Checks
Warm the engine, then graph upstream voltage alongside short-term trims at a stable suburban cruise. Healthy control shows brisk, rhythmic switching with trims hovering near zero. Lazy toggling, flat-lined voltage, or delayed recovery after small throttle changes points to a tired element or an external fault. Verify heater resistance, supply voltage, and ground integrity; inspect for exhaust leaks ahead of the bung that imitate a lean condition. Examine harness sections where they pass shields for abrasion. If power, ground, and plumbing are sound but the waveform remains sluggish, replacement is justified. The bolt-in solution that restores rapid transitions and predictable trim behavior is Honda Oxygen O2 Sensor 36531-R1A-A01/36531-R1A-Axx.
Tools, Supplies, and Shop Prep for a Predictable Install
Preparation prevents rounded hexes and singed knuckles. Assemble an oxygen-sensor socket, 3/8-inch ratchet with extensions, torque wrench, penetrating oil, brake cleaner, dielectric grease for the connector seal, and fresh loom clips if yours are brittle. Stage access: some bays allow removal from above once the intake duct is out; others require raising the car and removing a shield. Keep the new sensor sealed until the engine is cool and the bung is clean. A wobble extension helps maintain alignment on recessed units. With the bench set and lighting good, the process becomes a clean sequence rather than a wrestling match—especially when installing Honda Oxygen O2 Sensor 36531-R1A-A01/36531-R1A-Axx.
Safe Removal Techniques That Protect Threads and Wiring
Heat cycles can seize threads, so timing matters. Warm the manifold briefly, then let it cool to a safe touch so expansion helps without burning your hands. Apply penetrating oil and give it minutes to wick in. Keep the socket square; use steady pressure rather than hammering, which rounds flats. As the sensor breaks free, unwind the body without twisting the lead, protecting internal conductors for inspection or core return. Brush carbon from the bung gently—no aggressive chasing that risks altering the seat. With the site clean and threads healthy, the replacement will start by hand and seal properly on the first attempt, especially with Honda Oxygen O2 Sensor 36531-R1A-A01/36531-R1A-Axx.
Installation Sequence: Starting by Hand, Torquing, and Routing
Start threading by hand for several turns to confirm alignment; cross-threading here becomes a costly repair. If the replacement arrives with pre-applied compound, don’t add more—excess can migrate to the tip and poison the catalyst coating. Torque to specification so the crush washer seals without deforming the bung. Route the lead along the original path, reinstalling stand-offs and clips to maintain clearance from the downpipe and moving parts. Listen for a positive connector latch and gently tug to verify retention. A final flashlight sweep confirms slack for engine rock and avoids chafe points. Follow this routine when installing Honda Oxygen O2 Sensor 36531-R1A-A01/36531-R1A-Axx.
Post-Install Reset: Clearing Codes and Refreshing Adaptations
Fresh hardware deserves fresh data. Clear stored faults and reset fuel trims so the ECU can learn from clean inputs. Let the engine idle until the fan cycles, then hold a steady neighborhood cruise while watching upstream voltage and short-term trims. You want crisp switching with narrow oscillations centered near zero. Avoid hard accelerations during the first minutes while the catalyst stabilizes thermally. If your platform specifies an idle learn or speed-hold sequence, run it now. With accurate feedback restored, drivability typically smooths within a short errand loop. This is the ideal moment to log a “known good” snapshot after installing Honda Oxygen O2 Sensor 36531-R1A-A01/36531-R1A-Axx.
Drive Cycle Strategy to Confirm Readiness and Repair Quality
A deliberate loop validates the repair and sets emissions monitors efficiently. Begin with a full warmup, then maintain a steady speed for several minutes while logging upstream activity and trims. Add gentle accelerations and decelerations to observe transient recovery, followed by a short idle. Look for stable switching, quick recovery after throttle changes, and trims that remain centered. When the upstream signal is crisp, readiness follows without drama, and inspection visits become routine rather than stressful. If a test is imminent, follow the service manual’s speed and temperature windows precisely—and rely on the steady behavior delivered by Honda Oxygen O2 Sensor 36531-R1A-A01/36531-R1A-Axx.
Avoiding Common Pitfalls That Cause Repeat Visits
Most comebacks trace to small oversights rather than bad parts. Over-torquing can distort the bung and create micro-leaks that mimic mixture issues. Contaminating the tip with lubricants slows response. Misrouting the harness near radiant heat hardens insulation and sets the stage for intermittent faults. Skipping minor strain-relief clips allows vibration to fatigue internal wires. Prevent all this by hand-starting threads, torquing to spec, reinstalling heat sleeves, clicking the latch, and confirming slack with the engine rocked by hand. Finish with a quick data check to prove success. This disciplined approach pairs perfectly with Honda Oxygen O2 Sensor 36531-R1A-A01/36531-R1A-Axx.
Fuel Economy, Emissions, and the Immediate Payback
A responsive upstream signal centers trims and reduces wasted fuel, especially during light-throttle cruising where most driving occurs. When feedback lags, enrichment and enleanment overshoot, wasting energy and stressing after-treatment. Renewing the sensor tightens control so the engine reaches and maintains stoichiometric more quickly after cold starts. Drivers typically notice steadier cruise, cleaner tip-in, and a small but meaningful improvement at the pump. Tailpipe results improve too because the catalytic converter operates inside its design comfort zone. These gains show up quickly after fitting Honda Oxygen O2 Sensor 36531-R1A-A01/36531-R1A-Axx.
Catalyst Protection and Long-Term Powertrain Health
Catalysts thrive on balanced mixtures and fast corrections. Rich spikes overheat the brick; lean spikes invite misfire under load. A sluggish upstream reference forces the converter to mop up larger errors, narrowing your margin of safety during towing, steep climbs, or hot weather. Replacing a tired sensor restores brisk oscillation near stoichiometric, easing converter workload and stabilizing emissions performance. Most owners also notice fewer fuel smells and smoother idle after cold starts. For a small investment compared with downstream component costs, the proven safeguard is Honda Oxygen O2 Sensor 36531-R1A-A01/36531-R1A-Axx.
Tuning Context: Why a Healthy Narrowband Still Matters
Even when tuning with a dedicated wideband, daily driving relies on the factory upstream narrowband for closed-loop control. If that signal is slow or biased, transient fueling suffers and the car feels inconsistent despite a solid calibration. Before dyno time, confirm there are no exhaust leaks, clean ground points, and ensure brisk switching. Replace questionable components proactively to keep logs clean. With the upstream reference restored, tuners can focus on throttle mapping, spark blending, and knock limits instead of chasing noise. The foundation for that polish in Honda applications is Honda Oxygen O2 Sensor 36531-R1A-A01/36531-R1A-Axx.
Seasonal Factors: Cold Starts, Short Trips, and Heater Performance
Winter exposes weak heaters and sluggish elements. Short trips extend open-loop time and mask poor switching until fuel economy drops noticeably. After replacement, observe morning behavior: steadier idle, fewer odors, and quicker readiness progress signal success. If cold starts remain rough, verify coolant-temperature plausibility, intake leaks, and battery health. The right upstream unit reaches temperature promptly and keeps behavior consistent through frost, rain, and altitude changes. In practice, that consistency is exactly what owners report after installing Honda Oxygen O2 Sensor 36531-R1A-A01/36531-R1A-Axx.
Heat Management, Shields, and Harness Longevity
Thermal management is as critical as torque specs. Reinstall any shields you removed for access, ensuring they don’t chafe the harness. Replace missing stand-offs and clips; they create air gaps that reduce radiant heat soak. In tight bays, consider reflective sleeves where clearance is minimal. After a hot soak, recheck that the harness still clears edges and the downpipe; expansion can shift relationships. These small habits preserve insulation, prevent intermittent faults, and keep signal integrity high through summer road trips. They pair well with the robust construction of Honda Oxygen O2 Sensor 36531-R1A-A01/36531-R1A-Axx.
Counterfeit Awareness: Spotting Red Flags Before You Install
Counterfeits can mimic appearance while missing the heater curve or switching speed your ECU expects. Inspect labels for crisp printing, consistent fonts, and traceable batch codes. Compare connector molding and indexing rails with your original, and look for uniform plating on the shell. Reputable vendors publish specs and real photos rather than generic art. If anything seems off—damaged packaging, misprints, or unusual odors—pause and contact the seller. Protect your time and car by insisting on authentic, calibration-correct components such as Honda Oxygen O2 Sensor 36531-R1A-A01/36531-R1A-Axx.
Buying Smart Online: Listings, Photos, and Return Policies
Trustworthy listings show the actual connector keyway, lead length, thread treatment, and heat-shield geometry. Specs should mention heater wattage and operating temperature range. Read recent reviews discussing fit, routing, and readiness success after installation. Save screenshots and unboxing photos alongside your receipt for swift support. Clear return windows and storage condition notes indicate a careful supply chain for delicate ceramics. When every touchpoint—product page, packing slip, and label—names Honda Oxygen O2 Sensor 36531-R1A-A01/36531-R1A-Axx, you minimize compatibility risks.
Tools You’ll Reuse: Value Beyond This Job
An oxygen-sensor socket, small torque wrench, wobble extensions, and a bright work light improve many future repairs: downstream sensors, EGT probes, and tight fasteners around the exhaust. Dielectric grease, reflective sleeves, and spare loom clips also see repeat use when refreshing harnesses or installing aftermarket heat shielding. Building a compact exhaust service kit saves time later and helps each job look tidy and professional. If you’re assembling such a kit now, the flagship upgrade you’ll install today is Honda Oxygen O2 Sensor 36531-R1A-A01/36531-R1A-Axx.
Safety First: Lifts, PPE, and Fire Awareness
Exhaust work mixes heat, penetrants, and tight spaces. Wear gloves and eye protection, place stands on solid ground, and chock wheels when lifting. Keep penetrant away from hot surfaces, and ventilate the area to avoid fumes. Disconnect the battery if your platform is sensitive to connector cycling or if tools may contact power studs. Have a fire extinguisher rated for liquids within reach. A calm, prepared setup prevents rushed decisions and protects both you and the vehicle while fitting Honda Oxygen O2 Sensor 36531-R1A-A01/36531-R1A-Axx.
Electrical Integrity: Grounds, Shared Circuits, and Noise
Sensor accuracy depends on clean reference and ground paths. Corroded grounds or shared circuit faults elsewhere can mimic sensor failure. Voltage-drop test grounds under load, and inspect shared five-volt references if other sensors act erratically. Repair poor crimps or splices, and route harnesses away from ignition components to reduce electrical noise. A solid electrical foundation ensures the new sensor’s waveform is judged fairly. This diligence prevents misdiagnosis and lets Honda Oxygen O2 Sensor 36531-R1A-A01/36531-R1A-Axx shine.
Exhaust Integrity: Leaks That Skew Readings
Leaks upstream of the sensor admit outside air, artificially raising oxygen content and confusing closed-loop control. Soot marks, ticking noises, or fuel-smell patterns near flanges reveal trouble. Smoke testing or soapy-water checks can confirm small leaks. Fix gaskets, cracked flex joints, or loose fasteners before condemning components. With plumbing sealed, the ECU receives trustworthy data, and your new upstream unit can do its job. That sealed system is the best companion for Honda Oxygen O2 Sensor 36531-R1A-A01/36531-R1A-Axx.
Installation Nuances: Thread Prep and Crush Washers
If threads are pre-coated, do not add additional compound; excess can migrate to the tip. If bare, apply a minimal nickel-based anti-seize sparingly, staying clear of vents. Always replace single-use crush washers if they’re separate from the body. Torque evenly, then heat-cycle and recheck for any exhaust whisper. These small steps prevent leaks and ensure consistent thermal coupling for accurate sensing. Follow them faithfully when installing Honda Oxygen O2 Sensor 36531-R1A-A01/36531-R1A-Axx.
Reset Strategy: Adapting Without Guesswork
After clearing faults, let idle settle, then drive at a steady speed while monitoring trims and upstream activity. Resist hard accelerations until switching is crisp and stable. If your platform supports it, record a short log to compare with future service intervals. This data-centric approach confirms results and builds a baseline for the vehicle’s “normal.” Establish that standard immediately after installing Honda Oxygen O2 Sensor 36531-R1A-A01/36531-R1A-Axx.
Documentation That Builds Resale Value and Clarity
Good records turn a routine repair into future confidence. Note symptoms, codes present before repair, baseline logs, and post-install graphs showing stable trims and brisk switching. Photograph clip positions and connector engagement, and store the invoice and label for warranty needs. Organized notes speed future diagnostics and reassure buyers that emissions-critical parts were replaced thoughtfully. Make sure your records explicitly identify Honda Oxygen O2 Sensor 36531-R1A-A01/36531-R1A-Axx.
Warranty and Supplier Support: Setting Expectations
A solid warranty and helpful supplier shorten downtime if something goes wrong. Keep packaging until readiness completes and you’re satisfied with drivability. Verify warranty terms, response time, and whether diagnostics are required before approval. Vendors who share heater specs, storage conditions, and real photos tend to support customers effectively. Choosing a supplier that stands behind Honda Oxygen O2 Sensor 36531-R1A-A01/36531-R1A-Axx adds peace of mind.
Environmental Stewardship: Recycling the Retired Unit
Oxygen sensors Honda Oxygen O2 Sensor 36531-R1A-A01/36531-R1A-Axx. contain metals and ceramics that should re-enter productive use, not landfills. Many municipalities accept them through e-waste programs or parts stores that aggregate recycling. Keep the old unit intact, wipe off fluids, and deposit it responsibly. Pair this with cardboard recycling from the new part’s packaging to reduce the job’s footprint. Responsible disposal complements the efficiency gains delivered by Honda Oxygen O2 Sensor 36531-R1A-A01/36531-R1A-Axx.
When to Call in a Pro: Complex Fault Patterns
Certain symptoms point beyond a single component: multiple correlation codes, intermittent power-loss events, or behavior that changes with ambient humidity. Professionals bring scopes, calibrated meters, smoke machines, and platform-specific procedures that isolate faults quickly. If your logs remain messy after a careful install and leak check, consider expert help. Arriving with the correct upstream unit—Honda Oxygen O2 Sensor 36531-R1A-A01/36531-R1A-Axx—lets the technician focus on verification rather than parts sourcing.
Owner FAQs: Straight Answers from Experience
Can cleaning revive a slow sensor? External grime can be wiped off, but internal aging and contaminated coatings won’t regain response speed reliably. Do you need anti-seize? Use only what the manufacturer supplies or apply a minimal nickel formula away from the tip if threads are bare. Will disconnecting the battery fix drivability? It may reset trims briefly but won’t correct a weak signal. The durable solution is diagnosis, leak repair if needed, and installing Honda Oxygen O2 Sensor 36531-R1A-A01/36531-R1A-Axx.
Final Road-Test Checklist for Confident Sign-Off
Wrap up with a calm verification drive: neighborhood speeds to listen for leaks, a steady 60–80 km/h cruise to watch trims and switching, and a brief idle to confirm stability. Check for pending codes, then re-inspect clip engagement and heat clearances after a hot soak. Review your log for crisp oscillation and centered trims; if the dash stays quiet, the job is complete. Mark the mileage in your records and set a reminder to glance at trims during your next service. For long-term reliability and polished daily manners, few upgrades rival the impact of Honda Oxygen O2 Sensor 36531-R1A-A01/36531-R1A-Axx.
External Resources (Standards & Technical References)
- SAE J1979 — OBD-II Diagnostic Test Modes
- ISO 15031 — Road Vehicles/Scan Tool Communication
- US EPA — Basic Information on OBD-II
- NGK/NTK — Oxygen (Lambda) Sensors Overview
- Bosch Mobility — Oxygen Sensor Technology
Related Internal Links
Additional information
| OEM / Reference | 36531-R1A-A01 / 36531-R1A-Axx |
|---|---|
| Brands / Cross | Denso / Bosch aftermarket cross‑refs |
| Models | Accord (2014+), Civic (2012–2015), HR‑V (2016–2022) |
| Position | Upstream / pre‑cat |
| Specifications | 4‑wire heated A/F for precise control; OE connector, direct‑fit |
| Fitment note | Use VIN to pick the correct R1A suffix for your engine/market. |
| Source | hondapartsnow.com |
Related products


G-SPARTS – Leading Auto Parts Supplier Since 2009
Trusted by 1000+ Clients Worldwide | Chinese (BYD, Geely, Chery, …), Japanese (Toyota, Honda, Nissan, …), European (BMW, Mercedes, VW, …) & American (Ford, Chevrolet, Tesla, …) Car Spares | Best Prices & OEM Quality | 15+ Years Expertise | Professional Team, Fast Global Shipping
Copyright 2025 © G-Sparts All Rights Reserved. | Premium Chinese Auto Parts Supplier – Worldwide Shipping | Best Prices on OEM & Aftermarket Spares

Reviews
There are no reviews yet.