
Honda Oxygen O2 Sensor 36531-RNA-A01 – Ultimate Guide, Pro Tips & Trusted Fit | G-Sparts
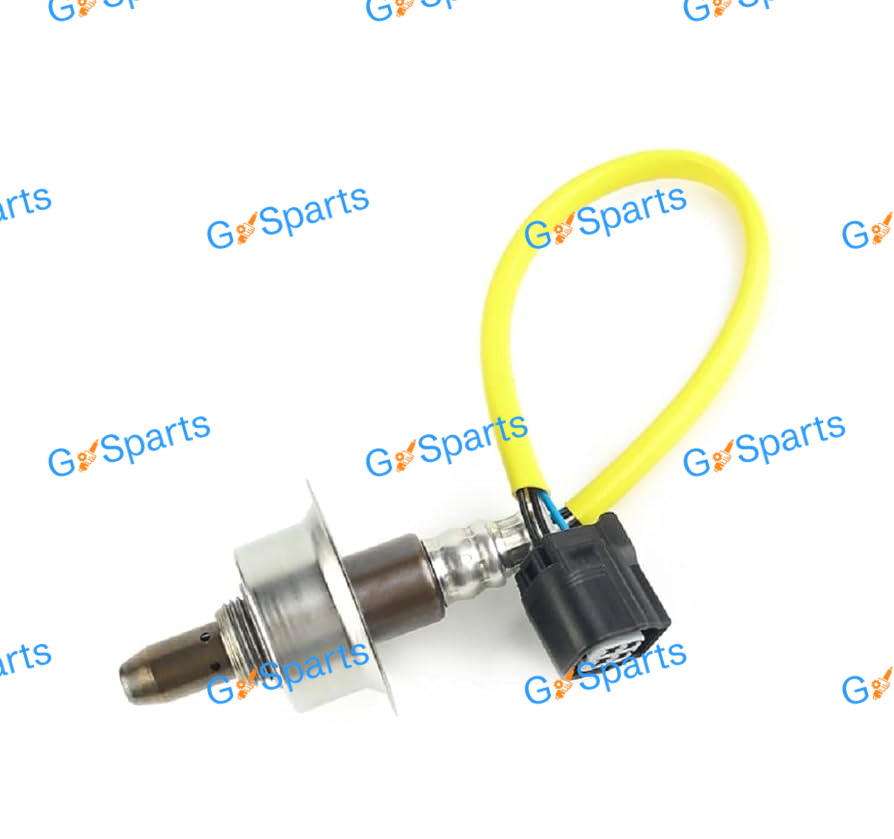
O₂ sensor for Honda Civic 1.8L (2006–2011), some CR‑V / Fit references – Upstream / A/F (pre‑cat). Specs: 4‑wire heated A/F style; direct‑fit connector; common M18×1.5 thread.
Did you like this product? Add to favorites now and follow the product.

(+86) 180 07 12 47 38 WhatsApp, Telegram, WeChat
Description
OE‑style oxygen (lambda) sensor listing for Honda applications. Models: Honda Civic 1.8L (2006–2011), some CR‑V / Fit references. OEM/reference(s): 36531-RNA-A01. Position: Upstream / A/F (pre‑cat). Typical specification: 4‑wire heated A/F style; direct‑fit connector; common M18×1.5 thread. Brands/cross‑refs: Denso / NTK / Bosch (e.g., Denso 234-9126). Fitment guidance: Use VIN to confirm bank & suffix (RNA vs RNX variants). Source: hondapartsnow.com.
How Accurate Oxygen Sensing Protects Performance
Closed-loop fuel control is only as precise as the data feeding your ECU, and nothing influences that feedback loop more directly than the upstream oxygen sensor. By comparing exhaust oxygen to atmospheric levels, the control unit trims fuel in real time, keeping the mixture near stoichiometric for clean combustion, smooth idle, and crisp throttle response. Selecting a part engineered for your engine’s calibration is the simplest path back to consistency. For owners seeking a straightforward, dependable fix, Honda Oxygen O2 Sensor 36531-RNA-A01 aligns with factory expectations, and installing Honda Oxygen O2 Sensor 36531-RNA-A01 restores the precise, agile feedback that modern management strategies demand.
Decoding the Part Number and What It Guarantees
Part numbers are more than labels; they encode connector geometry, heater wattage, lead length, thread pitch, and the voltage–current characteristics of the zirconia cell. Using a look-alike sensor with a near-match curve can invite subtle problems like wavering trims or readiness monitors that never set. The engineering behind the calibration assumes a very specific heater warm-up profile and switching behavior, especially during cold starts. That’s why confirming the exact identifier on your order and package is worth the few extra seconds it takes. When your invoice and box explicitly reference Honda Oxygen O2 Sensor 36531-RNA-A01, you’re validating that the electrical response and physical fitment will meet the ECU’s expectations without chasing ghosts later.
Fitment Overview by Engines and Platforms
Across trims and markets, similar engines may wear different intake and emissions packages that affect wiring routes, sensor locations, and the way the harness secures to heat shields. A careful visual check pays off: count the pins, inspect the indexing slot in the connector, and note the lead length to ensure it reaches the loom clips without tension. If your model year straddles a changeover, compare the bung angle and heat-shield clearances before ordering. When the physical puzzle pieces match—mounting threads, sealing surfaces, and plug shape—the rest falls into place during installation. Verifying these details and selecting Honda Oxygen O2 Sensor 36531-RNA-A01 prevents surprises, protects the harness from strain, and keeps the project running on schedule.
Telltale Symptoms of a Weak or Failed O2 Sensor
Symptoms often start subtly: a faint drop in fuel economy, a soft off-idle stumble, or a check engine light that appears after highway drives. Over time, the sensor’s response may slow, causing long-term fuel trims to drift as the ECU overcorrects. Cold mornings can amplify the issue because the heater struggles to bring the element to temperature quickly, extending open-loop operation. You might also notice catalytic converter efficiency codes if mixture control degrades. On a scan tool, watch for lazy switching or flat-lined voltage. Replacing a tired unit with Honda Oxygen O2 Sensor 36531-RNA-A01 refreshes the sensor’s speed and accuracy, helping the ECU regain tight control over air-fuel ratios in every condition.
DIY Diagnosis with Scanner, Multimeter, and Visual Checks
Effective diagnosis begins with data. With a warm engine, graph upstream oxygen voltage alongside short-term fuel trims and note the switching frequency and amplitude at steady cruise. A healthy circuit toggles briskly; a tired one lags or sticks. Inspect the harness for abrasion near brackets and shields, then confirm heater integrity by checking resistance at the connector according to service specs. If power, ground, and heater all test good but the switching remains erratic, replacement is justified. Installing Honda Oxygen O2 Sensor 36531-RNA-A01 restores the proper waveform, and post-repair logs will show trims tightening quickly with Honda Oxygen O2 Sensor 36531-RNA-A01 delivering fast transitions.
Fuel Economy and Emissions Benefits of a Fresh Sensor
Small errors accumulate. A slow or biased signal nudges trims off center, wasting fuel and elevating tailpipe emissions without always triggering a fault right away. Because the upstream sensor controls the lion’s share of fuel adjustments, getting its feedback right yields immediate, measurable results: steadier idle, smoother part-throttle response, and a catalytic converter that doesn’t have to mop up as much inefficiency. When you fit Honda Oxygen O2 Sensor 36531-RNA-A01, you’re returning the ECU’s primary metering reference to like-new speed and precision, which helps keep combustion efficient in a wide range of temperatures and loads and ultimately protects the converter’s oxygen storage capacity.
Tools, Supplies, and Prep Before You Turn a Wrench
Preparation transforms this into a clean, predictable job. Gather a quality O2 sensor socket, a 3/8-inch ratchet with extensions, a torque wrench, penetrating oil, brake cleaner, dielectric grease for the connector seal, and high-temperature anti-seize if the threads aren’t pre-coated from the factory. Plan access—some cars make the upstream sensor reachable from above with the intake duct removed, others require lifting the vehicle and pulling a shield. Photograph harness routing to recreate the factory strain relief and clip positions. Unplug the battery if your platform is sensitive to connector cycling. With the workspace set and replacement part ready, Honda Oxygen O2 Sensor 36531-RNA-A01 will install smoothly and seat correctly on the first attempt.
Safe Removal Techniques to Save Threads and Wiring
Heat cycles can weld threads to the bung, so patience is your ally. Warm the engine slightly to expand the manifold, then shut it off before you begin—too hot and you risk burns, too cold and corrosion fights harder. Apply penetrating oil and let it soak, supporting the socket squarely to avoid rounding the hex. If the sensor resists, a short, controlled breaker-bar pull is better than bouncing on the tool. Once free, unwind the body without twisting the harness; that protects internal leads from fatigue. Clean the bung with a soft brush to remove carbon. With the site prepped, installing Honda Oxygen O2 Sensor 36531-RNA-A01 becomes a straightforward, thread-friendly operation.
Installation Sequence, Torque, Anti-Seize, and Cable Management
Thread engagement is everything. If the replacement arrives with a factory anti-seize compound on the threads, do not add more—excess can migrate to the tip and impair readings. Start the sensor by hand to ensure alignment, then torque to spec so the crush washer seals without over-stressing the bung. Route the lead along the original path, using the provided clips and stand-offs to keep it away from radiant heat and moving parts. Seal the connector until the latch clicks positively. With Honda Oxygen O2 Sensor 36531-RNA-A01 seated properly, the ECU will see crisp signals immediately, and Honda Oxygen O2 Sensor 36531-RNA-A01 will be protected from heat-induced strain on the first drive.
Resetting Adaptations and Clearing Codes the Right Way
After installation, clear stored fault codes and fuel trims so the ECU can build fresh baselines. Some platforms respond well to a few minutes of idle followed by a gentle, steady cruise; others have published procedures that include specific speeds and durations. Avoid hard accelerations until the sensor heater demonstrates stable control on your scan tool. Confirm that pending codes remain clear and that monitors start to progress. If your battery was disconnected, you may notice initial idle fluctuations as the throttle and idle control relearn. With Honda Oxygen O2 Sensor 36531-RNA-A01 now providing fast, accurate feedback, the adaptation window narrows quickly and drivability smooths within a short, normal driving routine.
Drive Cycle Strategy to Verify Readiness and Data
A thoughtful drive cycle validates your work and sets emissions monitors efficiently. Start with a full warm-up, then maintain a steady, moderate speed while logging upstream sensor voltage and short-term trim behavior. Add gentle accelerations and decelerations to watch transition speed, followed by a brief idle period. You’re looking for crisp switching, narrow trim oscillations centered near zero, and no correlation faults. If local testing requires readiness, complete the manufacturer-recommended steps before visiting a station. Once Honda Oxygen O2 Sensor 36531-RNA-A01 proves stable through this routine, you can be confident that the ECU’s closed-loop control is back on song and that future diagnostics won’t be clouded by a weak signal.
Avoiding Common Mistakes That Cause Comebacks
The most frequent pitfalls are over-torquing, contaminating the tip with lubricants, routing the lead too close to hot surfaces, and neglecting to reseat connector locks fully. Another common oversight is failing to reattach small strain-relief clips, which leaves the harness to vibrate until internal conductors fatigue. Finally, clearing codes without confirming heater current draw and switching on a warmed-up engine can mask deeper issues. A brief checklist prevents all of these: hand-start threads, torque to spec, verify harness slack, click the latch, and log data. Following this disciplined approach with Honda Oxygen O2 Sensor 36531-RNA-A01 yields a durable, professional result that stays trouble-free across seasons.
Choosing OEM vs Aftermarket: Data That Matters
When comparing options, look beyond price. Ask for switching speed measurements at specified lambda steps, heater wattage curves, and validation that the connector and lead match factory heat-resistance ratings. Some generic sensors need crimp-on adapters; avoid them for upstream placement because added resistance and potential for moisture ingress can skew readings. The upstream position is too critical to compromise. For a bolt-in solution that mirrors the calibration your ECU expects, Honda Oxygen O2 Sensor 36531-RNA-A01 is the predictable choice, backed by consistent heater performance and correct lead length. Choosing Honda Oxygen O2 Sensor 36531-RNA-A01 minimizes adaptation time, reduces the risk of nuisance codes, and keeps your focus on driving, not rework.
Warranty, Returns, and Supplier Vetting
A clear return policy and documented warranty indicate a supplier confident in their inventory chain. Keep packaging until you complete a successful drive cycle; labels, barcodes, and protective caps can be requested for claims. Check that the seller lists storage conditions and shipping protections—humidity and impact are the enemies of ceramic elements. Reputable vendors provide detailed photos of the connector keyway, heat shield, and thread coating so you can compare before ordering. When your shipment label, in-box documentation, and website listing all reference Honda Oxygen O2 Sensor 36531-RNA-A01, you reduce uncertainty and streamline any support request that might arise.
Performance Tuning, Wideband Strategies, and Limitations
Upstream narrowband sensors drive closed-loop corrections; tuners often complement them with a dedicated wideband for calibration work. Even then, the factory ECU still relies on its primary sensor during daily operation. If that signal is slow or biased, your carefully crafted maps will feel inconsistent in traffic and during weather swings. For stable daily manners, the upstream unit must be healthy. Installing Honda Oxygen O2 Sensor 36531-RNA-A01 ensures the ECU receives the fast, repeatable switching it expects, preserving the polish of your tune while the separate wideband handles logging and optimization duties during dyno or street sessions.
Catalyst Protection and Long-Term Engine Health
The catalytic converter is both expensive and essential, and it depends on a balanced mixture to store and release oxygen effectively. Rich spikes overheat the brick; lean spikes invite misfires under load. A sluggish upstream signal forces the converter to work harder, trimming your margin of safety. Replacing an aging sensor prevents that slow creep toward inefficiency. With Honda Oxygen O2 Sensor 36531-RNA-A01 installed, closed-loop control reacts quickly to changing conditions, protecting the converter, smoothing torque delivery, and maintaining clean tailpipe output—benefits you’ll notice as steadier idle quality and fewer fuel-smell moments after cold starts.
If Problems Persist: Advanced Troubleshooting Playbook
If drivability issues remain after a proper install, widen the scope. Verify there are no exhaust leaks ahead of the sensor, as false air skews readings lean and confuses corrections. Inspect intake plumbing for vacuum leaks and ensure MAF or MAP data is plausible. Confirm heater power and ground voltage drop under load, not just static. Check for shared 5-volt reference faults if other sensors exhibit anomalies. Finally, scope the upstream signal while snapping the throttle; latency should be minimal. When the fundamentals check out and Honda Oxygen O2 Sensor 36531-RNA-A01 is confirmed healthy, look toward fuel pressure, injector balance, or ignition problems rather than blaming Honda Oxygen O2 Sensor 36531-RNA-A01 again.
Buying Smart Online: Photos, Specs, and Policies
Online listings should show the actual connector, indexing key, lead length, and thread coating—not stock art alone. Look for clear callouts on heater specs and operating temperature range. Read recent reviews focusing on ease of fit, wire length correctness, and post-install readiness success. Favor sellers who publish torque guidance and routing tips; those details reveal real product familiarity. Keeping a screenshot of the listing alongside your order confirmation can speed support if needed. When the product page explicitly identifies Honda Oxygen O2 Sensor 36531-RNA-A01, you’re far more likely to receive the exact, drop-in part that won’t complicate your weekend project.
Shipping, Storage, and Handling to Preserve Integrity
Treat the sensing element like glass. During shipping, impacts can micro-fracture ceramics; choose carriers and packaging that buffer shocks. Once delivered, avoid opening antistatic sleeves until the engine is cool and the work area is staged. Do not touch the tip with oily gloves or set it on dirty surfaces—contaminants can poison the catalyst coating. If you must store the part, keep it in a dry, temperature-stable environment away from solvents. Handling the connector by its body, not the wires, prevents strain on internal crimps. With this care, Honda Oxygen O2 Sensor 36531-RNA-A01 will install flawlessly and deliver factory-fresh performance from the first key-on.
Regional Variants, Emissions Packages, and Connector Keys
Global platforms can carry region-specific emissions hardware: secondary air systems, different manifolds, or altered harness routings. The plug keyway and lead length often reflect these differences. Before buying, check your under-hood emissions label, compare connector indexing, and confirm the upstream location relative to the converter. If your car has been imported or engine-swapped, match by physical attributes rather than catalog year alone. This diligence eliminates last-minute surprises during installation. When the checks align and you confirm the label matches Honda Oxygen O2 Sensor 36531-RNA-A01, you’ll have a high-confidence path to a clean, rapid repair with no wiring compromises.
Budgeting, Downtime Planning, and Total Cost of Ownership
Factoring the full cost picture leads to fewer headaches. Beyond the sensor, budget for penetrating oil, a dedicated socket, and perhaps new loom clips or heat sleeves if yours are brittle. Plan the job when you can complete a full warm-up drive cycle afterward to set monitors. Consider the long-term savings: improved fuel economy, reduced risk of catalytic converter replacement, and fewer diagnostic rabbit holes. A reliable upstream sensor pays for itself quickly in stabilized trims and consistent performance. Choosing Honda Oxygen O2 Sensor 36531-RNA-A01 aligns up-front cost with durability, and Honda Oxygen O2 Sensor 36531-RNA-A01 minimizes the chance of repeat labor or nuisance faults down the road.
Quick Answers to Common Owner Questions
Can a dirty sensor be cleaned successfully? Surface grime can be removed from the shell, but contamination of the sensing element or loss of response speed can’t be reversed reliably—replacement is the correct fix. Do you need anti-seize? Use only what the manufacturer supplies on pre-coated threads; otherwise, a nickel-based compound sparingly, staying clear of the tip. Will disconnecting the battery reset everything? It may clear adaptations but won’t fix a failing component. For a true, lasting solution, fitting Honda Oxygen O2 Sensor 36531-RNA-A01 provides the correct heater behavior, switching speed, and connector integrity your ECU relies on daily.
Create a Maintenance Record That Adds Resale Value
Documentation turns routine service into proof of stewardship. Record the date, mileage, fault codes present before the repair, and post-install scan logs that show stable trims and rapid switching. Photograph the routing of the new harness, the torque reading, and the sealed connector. Save the receipt and the old part for a short period in case of warranty needs. A tidy digital folder helps future troubleshooting and boosts buyer confidence when it’s time to sell. Listing the exact component—Honda Oxygen O2 Sensor 36531-RNA-A01—alongside your notes leaves no ambiguity for the next owner or technician, demonstrating that the upstream sensor was replaced thoughtfully and correctly.
Final Checklist and Confident Road-Test Wrap-Up
Before you button up, run a short verification routine: inspect routing clearance, confirm clip engagement, check for exhaust leaks, and log a warm-idle snapshot of fuel trims. Follow with a calm drive including steady cruise and gentle transitions, watching for crisp sensor switching and a quiet dash. If everything looks clean—no pending codes, no harness rub points—you’ve completed a high-value repair that pays back with every kilometer. The result should be a smoother idle, predictable throttle response, and monitors that set without drama. With Honda Oxygen O2 Sensor 36531-RNA-A01 installed correctly, you can drive away confident that your engine management has its most important feedback signal restored to factory form.
External Resources (Standards & Technical References)
- ISO 26262 — Road Vehicles Functional Safety
- ISO 11898 — Controller Area Network (CAN)
- ISO 14229 — Unified Diagnostic Services (UDS)
- SAE J1979 — OBD-II Diagnostic Test Modes
- AEC-Q100 — Stress Test for Automotive ICs
Related Internal Links
Additional information
| OEM / Reference | 36531-RNA-A01 |
|---|---|
| Brands / Cross | Denso / NTK / Bosch (e.g., Denso 234-9126) |
| Models | Honda Civic 1.8L (2006–2011), some CR‑V / Fit references |
| Position | Upstream / A/F (pre‑cat) |
| Specifications | 4‑wire heated A/F style; direct‑fit connector; common M18×1.5 thread |
| Fitment note | Use VIN to confirm bank & suffix (RNA vs RNX variants). |
| Source | hondapartsnow.com |
Related products


G-SPARTS – Leading Auto Parts Supplier Since 2009
Trusted by 1000+ Clients Worldwide | Chinese (BYD, Geely, Chery, …), Japanese (Toyota, Honda, Nissan, …), European (BMW, Mercedes, VW, …) & American (Ford, Chevrolet, Tesla, …) Car Spares | Best Prices & OEM Quality | 15+ Years Expertise | Professional Team, Fast Global Shipping
Copyright 2025 © G-Sparts All Rights Reserved. | Premium Chinese Auto Parts Supplier – Worldwide Shipping | Best Prices on OEM & Aftermarket Spares

Reviews
There are no reviews yet.